Showing posts with label Crafts. Show all posts

Saturday, October 17, 2015

Fruits and Vegetables


I spent last weekend creating felt fruits and vegetables for school. I created farm stand visuals this summer but when I was gathering my materials to bring to school realized I needed more fruits and vegetables for my farm stand.  Play fruits and veggies can be expensive so I found some felt food tutorials and went to work creating. I created pears, apples, bananas, oranges, tomatoes, broccoli, carrots, corn and pumpkins. It took me a long time but I was so happy with the results. I brought my finished felt foods and farm stand visuals to school on Wednesday. My paraprofessionals helped me build our farm stand. I was so pleased, it turned out just like I envisioned. The best part was the reaction from the students, they loved it! One of my three year olds exclaimed, "This is amazing!" That totally made the hours of sewing, turning and stuffing worth it. The farm stand visuals are in my TPT shop here.


Saturday, October 3, 2015

Zombie Dolls

It's October so that means it's time for zombie dolls. This year the theme for Val's zombie doll swap was primitive zombies. See what everyone made here. (Seriously go look - Kerry made an awesome creepy zombie.) My partner has young children and likes cute zombies not scary ones. This is my style so I knew exactly what I wanted to make this year. Then I was sick with a cold for a week so I didn't get started on my creation. My original idea was going to require more time so I went back to the drawing board and created something different. Do you ever have a time when your creative mojo disappears and you can't create what you want? I had to fight this little zombie into existence. 


A bit of zombie soup, anyone?  I tea stained my whole zombie instead of tea staining the fabric before I started creating. It looked so funny!

Actually I fought with two zombies. I used my machine to freeform stitch on colored wounds and a heart. Once I finished I hated him, so I threw him aside and made a new zombie with a combination of machine stitched and painted wounds. The hardest part was dressing a wonky looking little zombie. I’ve determined that I’m not a seamstress. If ever there is a zombie apocalypse and I have to make our clothing, my family will be the one wearing the wonky clothes. Actually I’m pretty sure we’d look like zombies if I had to make our clothing.


In the end I created a pair of jeans and a tee shirt for the zombie. Then I chopped them up a bit to show off the wounds. I named him Robbie and sent him on the way to my partner iara. He arrived safely at his new home this week.


After finishing the zombie for my partner I went back to the first one I’d thrown aside and tried to salvage him. I made the same clothes for him. They look like a set of brothers, Robby and Ricky. I’m not sure what their story is. The silver linings part of me thinks they were just cute little zombies that were adopted because “Zombies are people too.” Of course if you’re a cynic you might think they were zombie activists, protesting for zombie rights, who met a bad ending. I think I’ll stick with the silver lining version.
Now that Ricky’s been hanging out at my house for a week he’s grown on me and I’ve decided to add him to my zombie horde. I think it’s time to set up the zombie horde on the mantle again.  :)

Sunday, August 9, 2015

New Tutorial: Plastic Lined Car Trash Bag


A few years ago I started seeing DIY car garbage bags or as I call them carbage bags popping up on blogs. I knew I needed to make some. As a mom my car seems to fill up with straw wrappers and trash so a carbage bag is a must. I've made a few over the years but I found that the fabric got wet or yucky after awhile. I thought there had to be a better way to make carbage bags, then I discovered a roll of black plastic sheeting in the paint aisle at Home Depot. I started sewing a layer of the black plastic sheeting into the carbage bag and the problem was solved.
Last week I was showing some friends how to make plastic lined carbage bags. I decided to write out directions so I created a quick tutorial. It takes me about 15 minutes to make a carbage bag so they're quick and easy to make. Here's a link for the tutorial.

Thursday, July 23, 2015

Busy crafting


 This month the craft along theme over at Yarnigras Swapper Spot is independence or in other words, doing something you've wanted to do. My list of projects that I want to do is massive and my collection of projects I have started but have not completed . . . well that is way to long to talk about! Since it's summer my craft room and I have been spending some time together getting reaquainted. I seem to forget how much I enjoy time spent in my craft room until I start crafting again. Now I'm back in my craft room creating and finishing up some projects. Just look at what I've made.


 A few years ago I went to a workshop in Boston, one of the other workshop participants had an amazing scarf made from neckties. I loved it! I found the designer through a little research online but at $70 the scarves were too expensive for me. (I should have bought one, I looked them up again today, they're $150 now.) Granted they are unique and beautiful creations but I just couldn't bring myself to buy one for that price so I found a couple scarves at a thrift shop and thought I'd see what I could create.


Creating necktie scarves was harder than I thought it would be. I created the black one but I wasn't totally happy with it. I had pinned together a second necktie scarf but gave up on it after I didn't like the first. I stuck them in a drawer, pins and all, and forgot about them. I pulled the yellow and blue one out of my craft stash earlier this week determined to pull all of the pins out of it. On a whim I decided to take a few minutes to sew it together before removing the pins. I also re-finished the end of the black tie that I didn't like. Here's the finished product. They're nothing like the amazing creations the orignial designer makes but I like how they turned out and I completed an unfinished project that sat in a drawer for two years. . . yay for me!


I also pulled out a stitchery that I had finished a couple of years but hadn't done anything with. I loved the stitchery but couldn't decide what to do with it so it sat forgotten for years. Not any more, using some scrap fabric I sewed it into a little pillow.  Another unfinished project done.  :)  I feel so accomplished!


This is my favorite bag pattern, it's reversible. I have several of these bags and often give them as gifts. I even use one as my school bag, it's the perfect size. I decided to cut out a few of these bags using fabrics from my stash. I finished this one and another one this week and I have a crafting date with a friend next week to sew up the rest.


Lastly, I made a carbage bag for my neighbor. As moms, we always end up with trash and wrappers in the car when we're transporting kids around, so a carbabge bag is a necessity. I started lining these with some black plastic sheeting I found at Home Depot. It works perfectly to keep the fabric from getting wet or stained from the trash.

Tuesday, February 24, 2015

Long Time No Craft

I recently entered a graduate program to get ELL certified. I'm still teaching full time and started taking taking my first graduate course in January. It's been a long time since I've taken a graduate course and to be honest I've never taken one during the school year while I'm still teaching. I've mostly completed courses during the summer. It's a lot of reading and a lot of work but it's very interesting.


The toughest part is that my graduate course now takes up the time I used for crafting and reading for pleasure.  I'm a teacher so I read all the time however, I've always enjoyed reading just for pure entertainment and enjoyment. I love a good science fiction teen read, but it feels like I've haven't read a good book in forever. Instead I'm reading professional books and articles on language acquisition. Interesting stuff but it requires brain power and isn't reading for pleasure. This week I'm on winter break so I've decided to complete a craft or two and I'll be reading a book just for the pure enjoyment of reading. I've participated in the Goodreads book challenge for the last three years and have read 25 books each year. I'm participating again this year but I lowered my goal for this year. I hope to read 15 books in 2015. So far I've read three, but the good new is I have a couple picked out to start reading this week.


I participated in the February craft along over at Yarnigras Swapper Spot.  I created a zombie flower drink cozy using recycled wool coats and the cuff from a wool sweater. I know the point of this month's challenge was to create a coffee cozy to keep your hands warm. I love a good hot chocolate like anyone else, but I'm tired of winter and snow!! We've had over six feet of snow since January first. I just want to think spring, warm days and unsweetened ice tea. My zombie flower was created with these warm spring thoughts in mind. Maybe now that the first undead flower has bloomed, spring will finally come! Alas, wishful thinking!


I also bought some small clothespins and created these little spacemen.  I just used wooden clothespins, a thin Sharpie and twistable colored pencils to create these little guys but it feels great to be crafting again. I teach the Handwriting Without Tears curriculum to my four and five year olds at school. We're working on writing within the lines and spacing our letters. I thought these spacemen might help a few of the kids but I didn't want to leave anyone out so I made enough for the whole class. Maybe I'll get to sneak in another project before my break is over.

Wednesday, December 31, 2014

Happy Holidays


Happy holidays from us to you! May 2015 be a year filled with great happiness and good health! We wish you the best in 2015!


I participated in Yarnigras ornament swap again this year. I received 5 beautiful handmade ornaments that were added to my mini tree. I think I'm going to need a bigger mini tree!  


Here are the ornaments from this year. I love hanging all of my handmade ornaments each year! My tree is a combination of ornaments I've made and handmade ornaments from the swaps Val hosts at yarnigras swapper spot.


This year I created wire trees for the ornament swap. I made an extra one for my mom too(the one pictured is her's.)


 I aslo made reindeer from paperclay and wire.  I had them all painted and the pom pom noses on before I realized out that I had forgotten to add ears. I couldn't figure out how to add ears after the fact so this is a deaf little deer.


Guess who got her own sewing machine for Christmas?  She made a cape and Dennis, the pet rock from the book Danger is Everywhere.

Monday, October 20, 2014

Halloween Goodies and Zombies

My girl loves her holidays, so at the end of September, she started requesting that we pull out the Halloween decorations. We pulled everything out to start getting the house decorated.  To our surprise, Kerry sent us a Halloween package to get us into the Halloween spirit.  She sent this great Halloween bag that she made from a tee shirt.


 Kerry also sent these amazing bride and groom zombie cookies. We celebrated our 14th wedding anniversary the day before they arrived so we thought this was a great treat. Thanks Kerry!


Here are some more of the zombie cookies. Not only are the creatively awesome in a bloody zombie kind of way, they were delicious too!


I participated in the zombie challenge over at Yarnigras Swapper Spot, so Val sent me a package of Halloween goodies!  Thanks Val! I can't wait to try the homemade blueberry jam on my toast tomorrow morning.


For the zombie challenge I decided that I wanted to try my hand at paperclay. I've wanted to use paperclay for a couple of years now but have been nervous about trying it.  I procrastinated on this zombie project because I afraid to use the paperclay. I had a picture in my head for a couple of years now but wasn't sure I could create it. I really shouldn't have been so worried. The paperclay was awesome and easy to use. I covered a styrofoam ball and an oval to create the body. I used wire, aluminum foil and masking tape to create the arms and wings.


It took a few days to fully dry, but here's my finished project.  It's a zom-bee! 
This project works out to be a two-fer. It was for the zombie challenge and it's my Crafty Freaks project for this week.  


I added my zom-bee to the zombie horde, which is currently housed on the fireplace mantle. I'll move the zombie horde back to my bookshelves after Halloween. It's one big happy zombie family!

Friday, September 5, 2014

Crafty Freak Project Catch Up

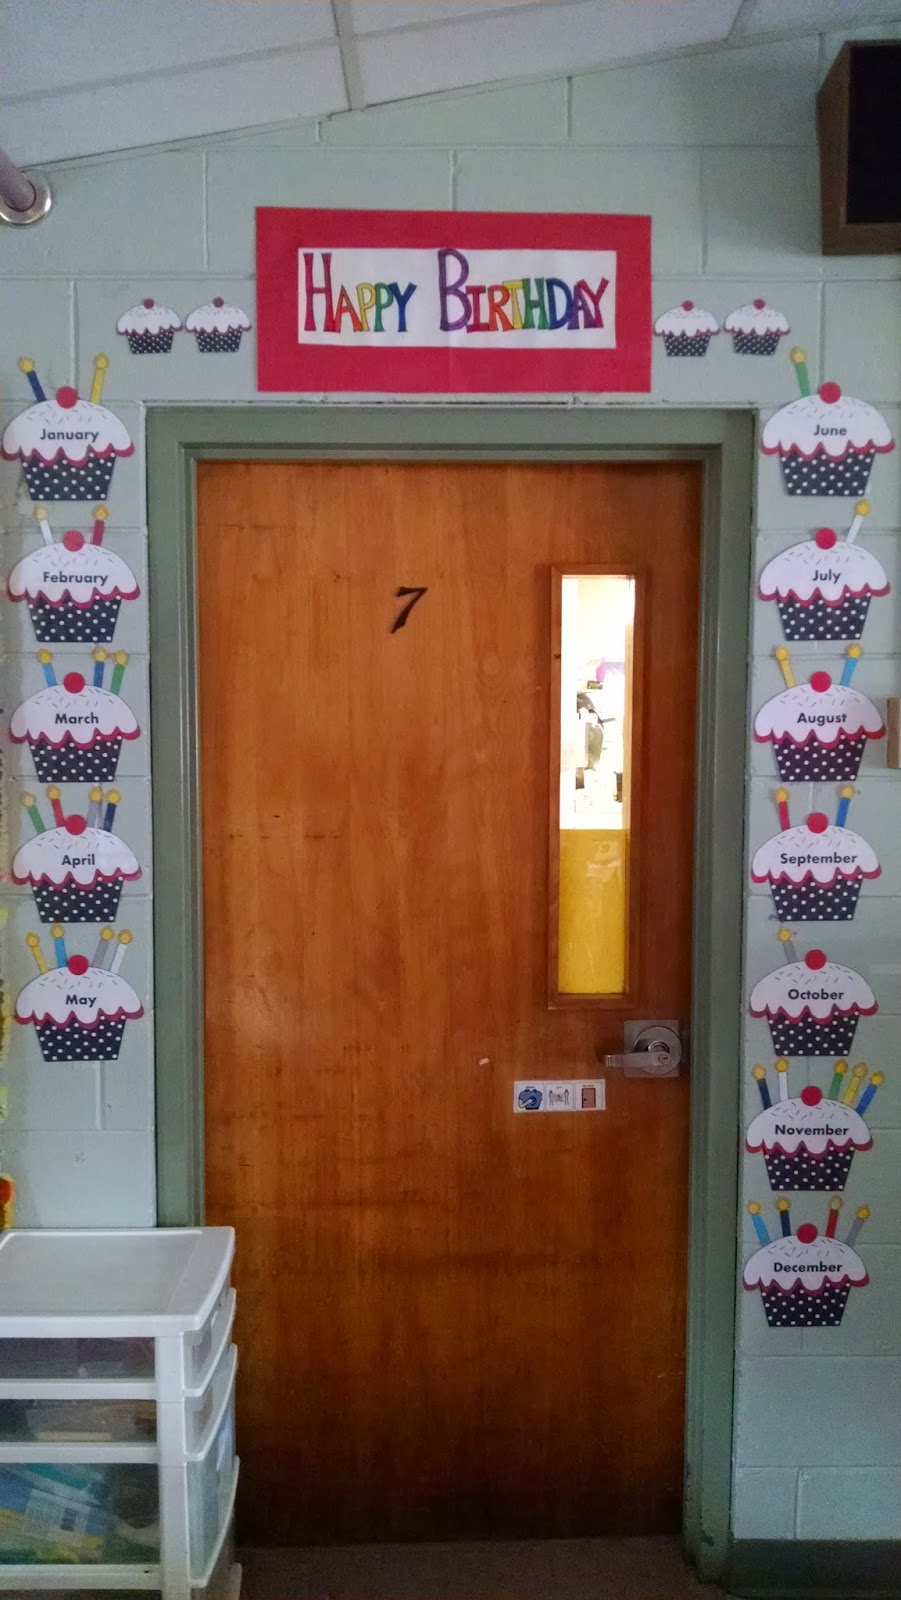
I joined the Crafty Freaks group on Pinterest this summer. I've been busy creating but I've been bad about posting my creations so now it's catch up time.  This summer I wanted to learn how to do something new so I decided to try drawing using my computer.  For my Crafty Freaks Project #3 I created this set of cupcakes to use in my classroom as a birthday display.


 I was happy with how they turned out, so I printed and laminated them. Then I realized that the pink cupcakes didn't match the colors my classroom. I didn't want to change the whole color scheme in my classroom, so I remade them in black with white polka dots to match my red & black polka dot theme.  I love, love, love them!  They look perfect in my classroom; plus polka dots just make me happy.


I created several different colored cupcake birthday displays and put them in my Teachers Pay Teachers store. I do still have a laminated set of the pink cupcakes so if you could use them for your classroom leave a comment. 


Crafty Freaks Project #4 was a bookshelf re-do. I had this bookshelf in my classroom. We don't have a lot in the way of storage in my classroom so the fabric on this shelf hides the materials that we don't want the preschoolers to have. 


We decided the shelf needed a little make over so I made two red curtains that can tie up to give the children access to the materials or we can untie the curtains and cover the shelves to limit access to materials.  I added some red metal storage buckets I bought at Target a few years back to add some extra storage.


Crafty freaks Project #5 is a set of colored ribbons for my classroom. I'm a special ed preschool teacher so I love creating things I can use in my classroom to teach and reinforce skills. I found two sets of wooden drapery rings at a consignment shop this summer.  I cut then tied four foot strands of ribbon onto the rings.  I made 2 rings of each color and a set of six rainbow ribbons. We're going to have lots of fun with these.

There you have it my Crafty Freaks catch up session. Now I have to decide what my next Crafty Freaks project will be. 

Friday, July 11, 2014

Crafty Freaks Project #1


Today is the due date for the first Crafty Freaks Project (due date being a loosely used term as there are really no rules or due dates for the Crafty Freaks.)  The goal behind Crafty Freaks is to get out there and create for the enjoyment of it. I love the idea of creating just to create with no guilt if you miss a project or really mess up on a project.  I'm excited about participating.


Here's my first project for Crafty Freaks; it's a centerpiece for my dining room table. I found the idea from this pin on Pinterest. I love that this project used materials from my house and yard. I used a quart size mason jar, hot glue, sticks, jute rope and flowers from my yard. It took longer than I thought to glue it all together. I thought it would be a 15 minute project it took more like an hour.  I love how it turned out and I didn't get any serious glue gun burns so that made me happy. Best of all I have this lovely centerpiece on my table. You can check out what some of the other Crafty Freaks are making by visiting the Crafty Freaks board on  Pinterest  or ( click here.)


Saturday, May 17, 2014

Recycled Tin Cans & Zentangle Tags


Last week was teacher appreciation week. As a special education preschool teacher I work with an amazing group of paraprofessionals.  I wanted to express my appreciation to these women, so I planted herbs in recycled tin cans as my way of saying "Thanks for all you do!"  What better way to express your appreciation than through a craft that involves recycling?!  It's good for the environment and functional since the herbs can last long into the summer. Not to mention the finished cans are pretty.


For this project, I saved the tin cans from my crushed and diced tomatoes.  After washing and drying the cans I transplanted parsley, basil or thyme into the cans. Then I went to my craft room where I pulled out my fabric scraps, burlap, jute rope and my glue gun. I cut my fabric scraps to fit the cans, then used my glue gun to glue the fabric and the burlap to the can. Next I tied some jute rope around the can and attached some of my zentangle tags. You can find my free zentangle tags here. I'm biased because I drew the tags, but I love them and use them on gifts throughout the year.


Wednesday, May 14, 2014

Crafting a Baby Gift


As a gift for Baby T, my girl made him a tied fleece blanket. She picked a frog print and a lime green & blue leopard print for the back. I forgot to take a picture of the leopard print back. She's gotten really good at cutting and tying blankets by herself, though she did have some unwanted help. Chunky loved laying on the fleece as she worked.  I had to keep calling him away from the project. When it came time to take pictures he had to get into the picture too, after all he had a paw in it's making.


We wrapped the finished blanket in a bright green ribbon and attached a frog toy, then we delivered it to Baby T. He's so tiny, sweet and beautiful! We both enjoyed holding him while he slept. Now that we have a new baby in the family I think we'll have to find a few more baby crafts to try.

Wednesday, January 29, 2014

Giving Bunnies & Art

Warning the photo quality isn't great, but I had to share a few bits of art I discovered mixed in with my daughter's school work. I love her drawings!


One of the spelling words this week was tiny, so this is Tiny a wee little dog.  He's so cute!


This is Mary as the title explains.  What I love about this piece of art is the sweet little bunny in the background.  He's a Giving Bunny.  My daughter wanted to make a stuffed bunny a few weeks back. I showed her a pattern for the Giving Bunny and off she went to create a family of Giving Bunnies.  


Here are the fruits of her labor or in this case bunnies.  Baby Bunny, Grandma Bunny and Mama Bunny. There was a fourth bunny but it was given to her friend in the spirit of the Giving Bunny Project.

Saturday, October 19, 2013

Painted Wine Glass Tutorial

I was never a wine drinker until recently. Now I like a nice glass of wine, but the glasses are really plain. I decided to try painting some wine glasses to brighten them up a bit. I bought some Folkart enamel paints and the rest is history.  Now I enjoy my wine in a decorated glass. I can't help but smile when I look at my decorated glasses . .  . they make me happy! Here's a quick tutorial to get you started on creating your own.  I dare you to try it!  Disclaimer: Once you've experienced the joy of drinking wine from a decorated glass it's hard to go back to a plain glass.

Materials:
Wine glass
Rubbing alcohol
Enamel paints(I use Folkart enamels)
Paint brushes, Q-tips or foam circles
Paper towels
Water


Directions:


Step one: Gather your materials and get ready to create a fun wine glass.


Step two: Wash your wine glasses and dry them. I've had luck purchasing my wine glasses at the Dollar Tree. They're a big glass but I don't mind.


Step Three: Wipe the outside of the glass with rubbing alcohol. This removes the oils that your hands leave behind. (I've skipped this step before and the glasses turned out fine, but the directions on the paint include this step.)


Step Four: Start painting.  I paint on my glasses but don't paint too close to the rim. You can use paint brushes, Q-tips or foam circles to apply the paint.
I did a circular design for my glass using a set of Martha Stewart foam circles I found on the clearance rack of my local craft store.  They work really well for making polka dots.   If you don't have foam circles, that's okay, I've used the eraser end of a pencil to make polka dots.

Note:  If you're worried about painting free hand you can draw your design on with sharpie and paint over it. You may want to coordinate the color of the sharpie with the color you'll be painting so the Sharpie won't show through.


Next I add a design to the base of the glass.

Step Five: Once you've finished painting allow your glass to dry for 1 hour.


Step Six: Place your glasses on a baking sheet then put them in a cool oven.  Turn on the oven and set the temperature to 350. Once the oven reaches 350 let your glasses bake for 30 minutes. When they've finished baking turn off the oven and leave them in the oven to cool.  

Step Seven: Once your glasses have cooled, wash and dry them again. I hand wash all of my painted wine glasses and haven't any problems with paint chipping or coming off.  The paint bottle says they should be top rack dishwasher safe, but I've never tested it.


Step Eight: Pour yourself a glass of wine, then sit back and admire your new wine glass!

Painted wine glasses make great gifts for family, friends and neighbors.  They are pretty, inexpensive and totally unique. Kids can even do this project. My 9 year old daughter painted the other two glasses in the picture.  She also painted two last year as a gift for her teacher.

Monday, July 30, 2012

Got Duct Tape?


 Duct tape, who knew it could be so much fun?  We bought several rolls of printed duct tape last summer, but never got around to using them. My daughter went to a craft camp offered by the local school district.  One of the girls at the camp brought in purses that she made using duct tape. We thought that was very cool so we pulled out the rolls of duct tape we had and started to create.

 Look at how proud she is of her crafts.  I helped with the purse but she made the matching bow and wallet herself.
 Here's another look at the goodies she made.  I just love that polka dot duct tape!

 This is the cheetah print hair bow I made for myself.

We had so much fun with the duct tape that the next day when we had the little girl from next door over for a play date, they pulled out the duct tape and created some more.  I just love the penguin bag my daughter made.  She made the main part of the bag and I taped it together using the last of the polka dot duct tape.  I wouldn't have been brave enough to put those patterns together but I'm glad she was because I love how it turned out.


This was my first try at making a rose pen from duct tape.  There are so many cool colors and prints of duct tape available; the possibilities are endless. I've been amazed to see all of the things people have created using duct tape.  I've seen some very creative items made with just duct tape. We've been having fun with it and I'm looking forward to trying to make a few more things with the duct tape.  Have you got duct tape? What is the most creative thing you've seen made of duct tape?