Showing posts with label Tutorials. Show all posts

Sunday, August 9, 2015

New Tutorial: Plastic Lined Car Trash Bag


A few years ago I started seeing DIY car garbage bags or as I call them carbage bags popping up on blogs. I knew I needed to make some. As a mom my car seems to fill up with straw wrappers and trash so a carbage bag is a must. I've made a few over the years but I found that the fabric got wet or yucky after awhile. I thought there had to be a better way to make carbage bags, then I discovered a roll of black plastic sheeting in the paint aisle at Home Depot. I started sewing a layer of the black plastic sheeting into the carbage bag and the problem was solved.
Last week I was showing some friends how to make plastic lined carbage bags. I decided to write out directions so I created a quick tutorial. It takes me about 15 minutes to make a carbage bag so they're quick and easy to make. Here's a link for the tutorial.

Friday, May 9, 2014

Zombie Sheep

I love sheep and I love zombies so why not create a zombie sheep? Well I did, in fact I created two. I'm participating in a swap over a Yarnigras' Swapper Spot. The theme is zombies in the nursery so I created a black sheep and rewrote the nursery rhyme Baa, Baa Black Sheep, zombie style.

Baa, Baa Zombie Sheep

Baa, baa black sheep covered in bites and wool,
Zombies came to feast upon him until they were full.
Awaking as a member of the unliving dead,
He craves the delicious treat that’s enclosed inside your head.
Now baad, baad zombie sheep is prowling through the night
Feasting on brains and entrails, what a scary sight!


I'm not great with writing poetry, but I did enjoy making the black sheep for my partner, Chris. I tried a different method for making these zombie wounds. I layered felted wool under the top piece then cut away the top to create wounds in their skin. I created a short little zombie wound tutorial that you can see here.  You never know when the desire to create a zombie wound might strike you.  :)


After I finished the zombie sheep for Chris I decided to experiment some more with wound making. I did get a little carried away creating wounds on my white zombie sheep. He's got a lot of wounds but I was having such a good time experimenting that I couldn't stop myself. This is hilarious to me since, in my real life I can't stand anything that cuts flesh.  I scream when I get a paper cut and can't watch violent movies. Instead to relax I create zombie dolls with flesh wounds, very ironic!


Saturday, December 14, 2013

A Little Holiday Zentangle Tutorial


It's holiday time. I like to make something to give to my co-workers, but this year I was struggling to come up with an idea. I've decided to make some holiday Hershey Kiss pretzels and Rolo pretzel bites but I wanted a tag to go on each bag of goodies.  I found some wood flower shapes at the Dollar Tree and inspiration struck. I created some wooden Zentangle tags that can double as a Christmas ornament.


I gathered my materials:

  • wood shapes(the package had 10 shapes for $1)
  • red and green acrylic paint
  • paintbrushes
  • black Sharpie
  • old plastic lid for paint
  • paper to protect my work surface
  • DMC thread


First I watered down some red acrylic paint.  There is no exact science to this; just squirt some paint on an old plastic lid, add a little water and mix. I painted one side of my wood pieces.  I did a couple of coats until I was happy with the color then set them aside to dry. 


Once they dried I flipped them over to paint the backside and the edges of my wood pieces. Then I set them aside to dry again.


After letting them dry, I used the black sharpie to Zentangle on the front of each flower shape. Note: I tried drawing on the wood first then painting but it didn't work as well.  Painting first stopped the Sharpie from bleeding across the wood. Plus the black turns out lighter when you draw then paint over it. After trial and error, my advice is paint first, then draw.


Here's a group of the Zentangle tag/ornaments I finished. I wrote To: and From: on the backside with Sharpie so they will work as a gift tag on my holiday goodies.The last step is to drill a hole in the center and thread a piece of DMC through. Tie a knot then hang them on your tree or attach them to your Christmas gifts.

Saturday, October 19, 2013

Painted Wine Glass Tutorial

I was never a wine drinker until recently. Now I like a nice glass of wine, but the glasses are really plain. I decided to try painting some wine glasses to brighten them up a bit. I bought some Folkart enamel paints and the rest is history.  Now I enjoy my wine in a decorated glass. I can't help but smile when I look at my decorated glasses . .  . they make me happy! Here's a quick tutorial to get you started on creating your own.  I dare you to try it!  Disclaimer: Once you've experienced the joy of drinking wine from a decorated glass it's hard to go back to a plain glass.

Materials:
Wine glass
Rubbing alcohol
Enamel paints(I use Folkart enamels)
Paint brushes, Q-tips or foam circles
Paper towels
Water


Directions:


Step one: Gather your materials and get ready to create a fun wine glass.


Step two: Wash your wine glasses and dry them. I've had luck purchasing my wine glasses at the Dollar Tree. They're a big glass but I don't mind.


Step Three: Wipe the outside of the glass with rubbing alcohol. This removes the oils that your hands leave behind. (I've skipped this step before and the glasses turned out fine, but the directions on the paint include this step.)


Step Four: Start painting.  I paint on my glasses but don't paint too close to the rim. You can use paint brushes, Q-tips or foam circles to apply the paint.
I did a circular design for my glass using a set of Martha Stewart foam circles I found on the clearance rack of my local craft store.  They work really well for making polka dots.   If you don't have foam circles, that's okay, I've used the eraser end of a pencil to make polka dots.

Note:  If you're worried about painting free hand you can draw your design on with sharpie and paint over it. You may want to coordinate the color of the sharpie with the color you'll be painting so the Sharpie won't show through.


Next I add a design to the base of the glass.

Step Five: Once you've finished painting allow your glass to dry for 1 hour.


Step Six: Place your glasses on a baking sheet then put them in a cool oven.  Turn on the oven and set the temperature to 350. Once the oven reaches 350 let your glasses bake for 30 minutes. When they've finished baking turn off the oven and leave them in the oven to cool.  

Step Seven: Once your glasses have cooled, wash and dry them again. I hand wash all of my painted wine glasses and haven't any problems with paint chipping or coming off.  The paint bottle says they should be top rack dishwasher safe, but I've never tested it.


Step Eight: Pour yourself a glass of wine, then sit back and admire your new wine glass!

Painted wine glasses make great gifts for family, friends and neighbors.  They are pretty, inexpensive and totally unique. Kids can even do this project. My 9 year old daughter painted the other two glasses in the picture.  She also painted two last year as a gift for her teacher.

Sunday, June 5, 2011

Mushroom Fairy Tutorial


Nature Girl and I have been creating together. We sat down and made these mushroom fairies together. I sewed and then Nature Girl stuffed them. We each painted our own little mushroom fairy. Nature Girl asked me to do the details on her fairy but she did all of the base coat painting herself. I just did the arms, details on the face and the polka dots. She wanted red polka dots on her wings so our fairies would look different. I think they turned out pretty cute, so I thought I'd share a quick little tutorial on how to make your own mushroom fairy. Eventually I'll add a pdf of the tutorial to the sidebar. In the meantime here are the steps.

Mushroom Fairy

Materials:
Muslin
Poly-fil
Acrylic paints
Paint brushes
Sharpie(ultra fine)
Pencil

Instructions:
1. Cut out the pattern for the mushroom fairy.

2.Fold the muslin in half, so that you have a double thickness, then pin your pattern pieces to the muslin. Cut out your pieces. You will have two of each piece when you are done.

3. Sew the two mushroom body pieces, leaving the bottom open. Clip your curves then turn and stuff your mushroom. Sew the opening closed.

4. Sew the mushroom fairy wings, leaving an opening for turning. Clip your corners then turn the wings right side out. Press your wings flat with an iron, then sew the opening closed.

5. Now attach the wings to your mushroom fairy's back. Place the wings on the back then hand-stitch a vertical line down the center of the wings to attach them to the body.

6. After your doll is sewn and stuffed, it's time to paint it with a base coat. I chose the tan of the face so I'd be able to see if I missed any spots. Good thing, you have to go back to paint a few times as the fabric will suck up the paint and you end up with light spots even though you know you painted it.

7. After the base coat dries use a pencil to mark where you want the face, top and bottom of the mushroom. Now paint the colors you want your mushroom to be, like the red and the white.

8. To add spots to your mushroom you can use an unsharpened pencil end dipped in paint to put the spots on. When your spots dry, finish off your mushroom by outlining using sharpie. Add your face, arms and hands with the sharpie.

Created by Jill Tacy – May 2011


Wednesday, April 6, 2011

Gnome Bowling

February's YOE theme was gnomes so I made this little gnome bowling set for a YOE giveaway. These gnomes are happily living at Kerry's house now. Nature Girl loved the movie Gnomeo and Juliet so when she saw these gnomes she wanted her own set. I thought she should be able to make her own set.

I gave her some wood doll pins and she went to work painting them. I took pictures of the process along the way and we've created a tutorial so others can make their own gnome bowling set too.
Nature Girl painted her gnomes blue and red like the movie. She had the idea of mixing the colors together. I helped put the polka dots on at her request. I also helped with sewing and gluing the hats on. When she finished making her gnomes she used a Chrystal Light container to make a gnome home to store her game in. I love the ladder going into the tree hole and the little squirrel she drew. It turned out so cute!
The picture is a bit dark but, here the gnomes have been set up for a game of bowling. In between frames the gnomes were paired up and married. The red hats married blue hats and lived happily ever after. It was very cute! If you'd like to see how to make your own gnome bowling set you can look on the sidebar or click here for instructions.

Saturday, October 16, 2010

Frankenstein & Ghost Brooches

This week for Spookify Me Saturday I'm sharing some Halloween brooches I made a couple of years ago for a Halloween swap with Val our wonderful Spookify Me host. Click here for a PDF with the pattern and simple directions.

Don't need a brooch?! I also made this pin the nose on the monster game using the same pattern. I just blew up the pattern really big and added a layer of batting in between. We hang Frankie up each fall. We have lots of different colored noses for him so everyone can choose a different color to pin on his face. Sometimes we just use him as a decoration instead of as a game.

Saturday, October 9, 2010

Another Spookify Me Project


Here's another project for Spookify Me Saturday. I made this cat wall hanging for a swap and was really excited to see how this turned out. I fell in love with it, so it was hard to send it on it's way but I did. I'm glad the new owner loves it! I created this tutorial so I can make another one when I have time. In the meantime I decided to share this tutorial for Spookify Me Saturday.

Sunday, October 3, 2010

Spookify Me Project


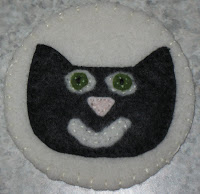
I made this cat coaster and thought it would be perfect for Spookify Me Saturday. Each Saturday in October, Val from Yarnigras will be posting projects for Halloween. It sounded like fun to me so I made this coaster from wool felt then wrote up a quick little tutorial for it. You can use this coaster to get into the Halloween spirit or use it all year if you choose. You'll find the tutorial here or on the sidebar. Check in next Saturday for another Spookify Me project and don't forget to check out Val's projects.

Tuesday, September 21, 2010

Tutorials

I'm a teacher so I love to teach. I also love to do crafts. What better way is there to combine these two loves than to write a craft tutorial. I created two simple tutorials to share. I'm not sure anyone else can use them but I thought I'd put them up them up anyway. You can click directly on the pictures here in this post to download the pdfs or click on the sidebar.


I have a couple of apron tutorials I'd like to do and another softie but I need time to make them again and take the pictures. I just need about 10 more hours in every day and then I might do all the things I want to do!!!
* Special thanks to Val and my husband for being my tutorial editors and my tech support. You two are great!

Thursday, July 31, 2008

What I've been up to....


Word Girl, 2. July Birdhouse mini quilt, 3. Katys felt bird quilt2, 4. Katys quilt package, 5. Needlebooks, 6. Satin spider apron, 7. Halloween Apron, 8. Ghost apron, 9. Friendly Frankenstein apron, 10. Halloween aprons 2008, 11. Sewing kit bag, 12. sewing kit swap, 13. Felt Frankenstein & Ghost Pins, 14. Birdhouse quilt top, 15. Tooth pillow

Here are some of the projects I've been working on in July. The ghost/ frankenstein apron and Word Girl costume are staying here with us, but most of the other things have already been sent on to their new homes. See. . .even though I haven't posted much this month I have been busy crafting! I have a tutorial for the tooth pillow. You can download the Tooth Pillow pdf here.

Thursday, July 17, 2008

Nature Girl Sews and A Quick Tutorial

That's right, Nature Girl sews! She completed her first sewing project while we were on vacation. She insists this is her second sewing project since she helped me stitch on one of my projects a few months ago. So call it a first or call it a second sewing project, either way we were both proud of the finished project! She sewed this bookmark with a little assistance. She did very well and quickly picked up the running stitch. I love the wobbliness of the stitches and I am so proud of my little crafter!

Here's her finished bookmark in a book. Now we're looking forward to trying a few more sewing projects this summer. I discovered a site called Kids Sewing Projects. It has some great projects for kids who are beginning to sew. Try some of the projects at Kids Sewing Projects or try our tutorial for the felt bookmark. Happy sewing!

Felt Bookmark Tutorial:
Materials:
12 inches of ribbon
felt(cut two flower shapes and two shapes for the bottom)
safety pins
embroidery thread
needle
Place the ribbon between the two felt flowers. Pin in place with safety pins. Sew around the flower using a running stitch. Make sure to stitch through the ribbon so it will stay in place. Then sew your pieces to the bottom of your ribbon. Again make sure you stitch through the ribbon. I did two sets of leaves on the bottom of this bookmark but you can sew just one set on the bottom.

We sewed flower bookmarks this time. We want to try this again and make a felt bird bookmark as a gift for a friend.
Edited: Nature Girl's bookmark project is now on Kids Sewing Projects. You can see it here.

Monday, July 7, 2008

Needlebook Tutorial

When I saw this cute cherry notepad at JoAnn Fabrics I just loved it. I'm doing a secret pal activity with my quilt guild. Each month you bring a little gift for your secret pal. I knew this would be a great gift for my secret pal. It made me think of the jam jar cover tutorial over at LucyKate Crafts. That inspired me to create this cherry needlebook.

These are for my secret pal but I liked the needlebook so much that I had to make one for myself. This is my first needlebook. I had so much fun making these and decided a tutorial was in order.


If you'd like to make a cherry needlebook you can download the tutorial and pattern here. Happy sewing!

Special thanks to Susan for editing this tutorial for me! I'm looking forward to making a few more this week to give as gifts! Yep, one will be for Susan.
Also thanks to my husband who is my technical support. Without him I wouldn't be able to upload a tutorial. Thanks honey, you're the best!

Tuesday, April 22, 2008

Revised Snack Bag Tutorial


I decided to make a few more snack pouches and matching napkins this morning. I pulled up my reusable snack pouch tutorial to refresh my memory. I started to cut out the fabric and thought this doesn't seem right. Well it wasn't. The measurements would make a nice sandwich size pouch not the snack pouch I wanted. I had figured out measurements for both sizes back when I made the pouch. I must have confused the measurements when I wrote out the tutorial. Anyway If you downloaded the reusable snack pouch tutorial and want the snack size please download the revised tutorial. Sorry for the goof! Happy Earth Day!
Edited:
Snack size pouch measurement = 7.5 inches by 11 inches.
Sandwich size pouch measurement = 7.5 inches by 19 inches.

The construction is the same for either a snack pouch or a sandwich bag. So the tutorial instructions would be exactly the same for either. The difference in measurements will just change the final size. So really this is a two for one tutorial by changing the largest measurement you can have either a snack pouch or sandwich bag.
The 7.5 x 19 inch size for sandwich bags should accommodate bigger pieces of bread. If you're a Wonder Bread sandwich eater you may want to cut that down to 7.5 X 15.

Friday, April 18, 2008

Sling Bag Tutorial


I created a tutorial for my sling bag. I hope you'll enjoy creating one for yourself. If you make one please post pictures in the Flickr group Sling bag from Life With Nature Girl. I look forward to seeing what you create. If you have any questions e-mail me. Happy sewing!

Click to download a pdf of the Sling Bag Tutorial

Thursday, April 10, 2008

Reusable Snack Bag & Napkin Tutorials


I suffer from plastic use guilt. What is this you ask. It's the sense of guilt that overcomes me every time I open the drawer to pull out a plastic bag. We all know that plastic is bad for the environment but it's very hard to give up it's convenience and go "green." In an effort to be a little more "green" and alleviate some of my plastic use guilt I created tutorials for a reusable snack bag and reusable napkin. It's quick and easy, taking less than 30 minutes(less time if you're not interrupted by a child) to create both the pouch and a matching napkin. I made several snack pouches and matching napkins for my daughter's preschool snack. These are my first tutorials. I hope you'll make some and help alleviate plastic use guilt all around the world! Feel free to contact me with questions.

Click to download a pdf of the Reusable Snack Bag Tutorial


Click to download a pdf of Reusable Napkin Tutorial

Edited:
This reusable snack bag tutorial was revised. The link should take you to the revised tutorial. Snack size pouch measurement = 7.5 inches by 11 inches.
Sandwich size pouch measurement = 7.5 inches by 19 inches.

The construction is the same for either a snack pouch or a sandwich bag. So the tutorial instructions would be exactly the same for either. The difference in measurements will just change the final size. So really this is a two for one tutorial by changing the largest measurement you can have either a snack pouch or sandwich bag.
The 7.5 x 19 inch size for sandwich bags should accommodate bigger pieces of bread. If you're a Wonder Bread sandwich eater you may want to cut that down to 7.5 X 15.