Saturday, October 19, 2013

Painted Wine Glass Tutorial

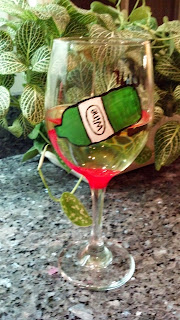
I was never a wine drinker until recently. Now I like a nice glass of wine, but the glasses are really plain. I decided to try painting some wine glasses to brighten them up a bit. I bought some Folkart enamel paints and the rest is history.  Now I enjoy my wine in a decorated glass. I can't help but smile when I look at my decorated glasses . .  . they make me happy! Here's a quick tutorial to get you started on creating your own.  I dare you to try it!  Disclaimer: Once you've experienced the joy of drinking wine from a decorated glass it's hard to go back to a plain glass.

Materials:
Wine glass
Rubbing alcohol
Enamel paints(I use Folkart enamels)
Paint brushes, Q-tips or foam circles
Paper towels
Water


Directions:


Step one: Gather your materials and get ready to create a fun wine glass.


Step two: Wash your wine glasses and dry them. I've had luck purchasing my wine glasses at the Dollar Tree. They're a big glass but I don't mind.


Step Three: Wipe the outside of the glass with rubbing alcohol. This removes the oils that your hands leave behind. (I've skipped this step before and the glasses turned out fine, but the directions on the paint include this step.)


Step Four: Start painting.  I paint on my glasses but don't paint too close to the rim. You can use paint brushes, Q-tips or foam circles to apply the paint.
I did a circular design for my glass using a set of Martha Stewart foam circles I found on the clearance rack of my local craft store.  They work really well for making polka dots.   If you don't have foam circles, that's okay, I've used the eraser end of a pencil to make polka dots.

Note:  If you're worried about painting free hand you can draw your design on with sharpie and paint over it. You may want to coordinate the color of the sharpie with the color you'll be painting so the Sharpie won't show through.


Next I add a design to the base of the glass.

Step Five: Once you've finished painting allow your glass to dry for 1 hour.


Step Six: Place your glasses on a baking sheet then put them in a cool oven.  Turn on the oven and set the temperature to 350. Once the oven reaches 350 let your glasses bake for 30 minutes. When they've finished baking turn off the oven and leave them in the oven to cool.  

Step Seven: Once your glasses have cooled, wash and dry them again. I hand wash all of my painted wine glasses and haven't any problems with paint chipping or coming off.  The paint bottle says they should be top rack dishwasher safe, but I've never tested it.


Step Eight: Pour yourself a glass of wine, then sit back and admire your new wine glass!

Painted wine glasses make great gifts for family, friends and neighbors.  They are pretty, inexpensive and totally unique. Kids can even do this project. My 9 year old daughter painted the other two glasses in the picture.  She also painted two last year as a gift for her teacher.

Friday, October 18, 2013

Something From School

I'm a special education preschool teacher.  I teach three, four and five year olds.  Due to the nature of my job it's not often I can share pictures from my classroom, but today I have something I can share.  I went to a fabulous workshop this summer where I learned about caring for about Monarch Butterflies. The workshop is offered by The Monarch Teacher Network. Our first preschool unit is "Changes All Around Me" so this fall we have been raising monarch caterpillars in my classroom.


Here we have one caterpillar in it's chrysalis and a second in a J getting ready to go into a chrysalis.  This rearing cage in made from a tomato cage and tulle, it's been great for raising our caterpillars. I learned how to make it in the workshop.


Today, two weeks after the first caterpillar went into it's chrysalis I arrived at school to find two beautiful monarch butterflies.  The children haven't seen them yet as my students don't attend on Fridays. I've emailed butterfly pictures to all the families and have my fingers crossed that the flowers and the apple juice I left in the rearing cage will tide them over until the children & I arrive on Monday morning.


We've been working on patterning in preschool so we looked at the patterns on our caterpillars to create these paper caterpillars.


We also created these little butterflies by rolling marbles in orange and black paint then cutting them out to be the size of an actual monarch. We're participating in the Monarch Butterfly Symbolic Migration. Our paper butterflies were tucked into the larger butterfly before being mailed off.  They will eventually be sent off to children in Mexico to symbolize the journey Monarch Butterflies make each fall.  Then in the spring we'll receive a set of paper butterflies made by children somewhere in North America to symbolize the Monarch's journey North in the spring. I'm excited to participate. It's been a lot of work to care for these little creatures but it's been well worth it.   My kids have been so excited to see how they have changed.

Sunday, October 13, 2013

Zombie Making

Fall is here and Halloween is just around the corner.  It's the perfect time for making some zombie dolls.  I recently participated in the Alice in Wonderland Zombie Swap. Zombie doll making is so much fun, it was hard to stop when the swap was over.  I know for most people that sounds weird.  Seriously some of my family, friends and neighbors think I'm a bit weird making zombie dolls. Worse yet I mail them to other people. They don't really get it, but that's okay I have a group of zombie making friends that do.  After the Alice in Wonderland Zombie Swap, a group of us decided we weren't ready to end the zombie making fun so a challenge was issued . . . make a zombie doll for yourself. 


A few years ago I did my first zombie doll swap with Val & Friends.  I saw a cartoon about zombie rehabilitation where the zombies were re-trained to do work by hanging a stick with a dangling brain in front of them. You know, dangling the proverbial carrot only in this case they like brains.  The idea intrigued me so I created this little guy here.  His name is Dead Fred.  I was so sad to see him go. I've often thought I'd like to make Dead Fred again for myself. When the zombie challenge was issued, I immediately thought about Fred. I dug up pictures so I could  re-make him, but true to myself I had to change it up a bit.  This time he's made from recycled wool sweaters and coats, one of my favorite mediums.

 Meet Dead Donald the newest zombie in town.  Like Fred he's part of the Zombie Rehabilitation program. I have his brain all made I just need to rig it up on the stick.  Even though he's not quite finished I couldn't resist sharing him. He's much bigger than I planned but I like how he turned out. I think we'll go sit down on the couch together and read the second book in the Alice in Zombieland series.

Wednesday, October 9, 2013

Good Mail Can Make You Cry


Have you ever gone to the mailbox and found a random package you weren't expecting?  That happened to me this week.  When my husband brought in the mail, there was a surprise package from my friend Val.  It's not my birthday, a holiday or even a package for a swap.  Val sent me a thanks for being my friend package.  It brought tears to my eyes and then it made me smile. Val made this cute little voodoo doll and sent it to me. Isn't he so cute?!!  I love him!  After I wiped away the happy tears I had to stick him with the pins she sent.  He really didn't mind.   I have to admit I have crochet envy, as I only know how to crochet a chain. I adore the amazing crochet creations Val makes and now this one is mine.  Thank you so much Val!  You made my day! Thank you for being my friend!

Friday, October 4, 2013

Playmakers


I had the opportunity to become a Life is Good Playmaker this year.  Playmakers are a group of people who are trained to bring joy, optimism and a love of life to children who have been affected by trauma, violence, illness and poverty.  You can learn more about Playmakers or look at the schedule for future trainings at the Life is Good website. I've been a teacher for almost 20 years so I've attended a lot of trainings and workshops during that time.  The LIG Playmakers training is by far the best training I've ever attended. 


Yes, the fun starts here.  During the Life is Good Festival a few weeks ago I got to meet and work with a group of LIG Playmakers to play games and spread good vibes through play. It was a lot of fun to help kids into sacks then watch the laughter and joy as the hopped across the field.


Here's our sack race crew for the first shift on Sunday.  In case you haven't done a sack race in a few years, it's much harder than I remembered.  I was super slow and quickly realized it was way more fun helping the kids race than racing myself.


This photo comes from the LIG Playmakers.  These are the people who volunteered to play games with children and their families.  I'm in the back on the right hand side(the dark blue sleeve.)


Playmakers rock! I got to meet the Chief Playmaker, Steve Gross. He's in the middle in the brown shirt.  He was super nice. Really all of the Playmakers I've meet are nice, it goes with the whole Playmaker philosophy of spreading joy. It was so much fun to meet other Playmakers and spend the weekend playing with kids and their families.  I'm looking forward to the LIG festival next year.


For my crafty friends, I just had to share this picture.  This is Emily, she's one of the awesome Playmaker trainers. Can you believe she made this amazing dress from a ripped parachute?  Isn't it fabulous?!


Tuesday, October 1, 2013

Life Is Good Festival 2013


I volunteered at the Life Is Good Festival a couple of weekends ago.  It was fabulous!  I had fun and got to see some great music to boot.


The proceeds from the festival benefit the Life is Good Playmakers, who help children in need. I'll share more about the LIG Playmakers in another post. In the meantime the theme of the festival was Good Vibes Save Lives.

 The festival had music, games, food and art.  You know we can't resist an art project.  My girl and I each painted a square tile. The tiles had a number on the back and had specific colors that could be used. This is my daughter's tile.


He're my tile. I included my name and a bit of a zentangle flavor on my tile.


The tiles were place into slats to create a large mural. You can see our tiles two rows to the right of the letter N in this picture.  Each person who painted could make a monetary donation. The donations collected benefit the The One Fund Boston.  $538,150 was raised from these donations over the two days of the festival.


This is the finished mural.  Isn't it awesome!  I love that our artwork is part of a larger piece, created by a community of people who want to help others. You can't see our tiles in this picture with all of the people, but the tiles are there(behind the head of the guy in the blue shirt.)


Best of all the festival ended with almost two hours of Jack Johnson.  Those of you who know me, know that he's my favorite.  I love to listen to my Jack Johnson albums when I sew. My husband and my daughter attended too so we enjoyed the show as a family.  It was awesome!  It turns out Jack and his family walked around the festival like the rest of us. Of course I was disappointed that I didn't see him but really it's probably for the best.  I'd like to think I'd play it cool and act normal but in reality I'd probably act like some crazed fan and make a total fool of myself.

The festival was great! I'm already planning to volunteer again next year.